brass cuff

drilling holes


sawing through brass


tools of the trade


filing brass


brass cuff


the closure

I spent most of Friday and Saturday sawing, drilling, filing, and hammering this cuff into shape. My mom admired a similar bracelet while we were out shopping last month, and when I got home, I sketched up my own design. I love how it turned out, but I probably won’t make anything like it for quite a while– it required the kind of arduous work that only a mother’s day present can inspire. The cut-out is a favorite shape of mine, an homage to Gothic architecture, which I’ve long admired. Not one to waste, I used the cut-out scrap to make myself a matching necklace:

necklace + braceletI’m so fortunate to have not one, but two amazing mothers in my life. Happy mother’s day, ladies!

Posted on by Jessica in Crafts | 3 Comments

how to transform a pair of jeans

jean transformationFor most of my life, buying a pair of jeans has been somewhat of an ordeal. It all started in middle school, when I suddenly realized (probably due to the less-than-gracious observation of a classmate) that all of my pants were WAY too short. Determined not to be unfashionable for a single second longer, I dragged my mom to the mall. Several stores and dressing rooms later, we discovered that unless the shop sold pants with different lengths, anything that fit around my waist would have a comically short inseam. On top of finding a size and cut of jeans to fit my gangly preteen body, I had to look for a pair designated as “long”.

Now that there’s a much wider range of acceptable jean lengths, I’ve got other problems– if I find a pair of pants that fits around my hips, the odds are pretty good that I’ll have an extra handful of loose, gaping fabric around my waist. Since it’s an issue with the cut of the jeans and not the size, all I can really do is try on pair after pair and settle for whatever fits the best. Sometimes the best option is to go thrifting, because I’ll have access to a bevy of different brands of jeans, all with a different style and cut.

Although I always seem to have a backlog of several dozen ideas for personal sewing projects, I’m usually too invested in other endeavors to make time to sew myself clothes. Altering thrifted clothes is a nice compromise– most of the work is already done, and sometimes something as simple as moving a hem or replacing some buttons can make a garment your own. It’s also a good option if you’re not sure about the longevity of a trend, and you don’t want to spend money on a piece of clothing that may not be in style in six months. Unfortunately, I’m usually so excited about the prospect of new-to-me clothes that I never remember to document the alteration process (case in point: the shirt in the photo below, which used to be large and long-sleeved).

This time, I made sure to take a picture through each step of the transformation. Brightly colored jeans were a perfect candidate for this project– even the higher-quality versions of these pants seem to be made of a super stretchy cotton/spandex blend, which is not my favorite fabric for jeans. Altering a thrifted pair gives me total control over the fit of the jeans and the color they’re dyed, and I was able to select a pair that was 100% cotton and not stretchy at all.

Step One: Select a pair of jeans. Find a pair that fits well, and don’t worry about the style of the pant legs or the length (unless they’re too short) because those things are easy to alter. I ended up with a pair of boot cut Levi’s, and knew I’d want a narrower and shorter pant leg.

Step Two: If you’d like to alter the shape of the pant legs, start by ripping out the hem around the bottom of each leg. If you’re not changing the length, you can roll it back up and re-hem it after adjusting the sides. Next, put the jeans on inside-out. While standing up with your legs as straight as possible, pin the outside of one pant leg so that it’s better fitted to you. (Although it’s more visible, the outside seam is a flat seam, and is much easier to adjust than the felled seam on the inside of the leg. Unless you’re prepared to rip out a couple existing seams up most of the length of the pant leg, you should leave that one alone.) I usually pin the leg in front of a mirror so I can see what I’m doing, and I typically start pinning a little above the knee.

After you’ve got the leg pinned the way you like it, test out the fit by walking around, (carefully!) sitting down, and removing the jeans while they’re still pinned. You want to be sure there’s enough extra room for movement and that the bottom of the leg is large enough to fit over your heel. You’ll need much more leeway if the jeans you’ve selected aren’t stretchy. Once the jeans pass the fit test, lay them flat and scrutinize the pin placement. Make sure the front and back sides of the pant leg lay flat against each other, so you can avoid any accidental gathers when you sew the new seam. I usually make small changes to my pin placement to ensure they’re all in a straight line. When you’re satisfied with the first leg, fold the jeans in half, carefully lining up the outside seam of each pant leg. Begin pinning the un-pinned leg, checking as you go to make sure their placement matches the first leg. When both legs are pinned, I usually just do a visual check to see if they look identical. If you’re really diligent about accuracy, you can measure as well. Try them on once more while they’re both pinned to make sure you like the fit.

To sew the new seam, start a few inches above the first pin. Sew along the existing seam, then gradually move in, meeting each of your pins until you reach the bottom of the leg. After you’ve sewn each leg, try the jeans on again. Really test them out this time– do some lunges or try sitting indian-style to make sure you’ve given yourself enough room to comfortably move. If necessary, make adjustments to the seam. When you’re happy with the fit, serge the outside of the seam (or, if you don’t have a serger, trim and sew a zig-zag stitch to prevent fraying). Re-hem the bottom of each pant leg, and you’ve got yourself a new pair of skinny jeans.

Step Three: If you want to dye your newly-skinny jeans a really bright, vibrant color, it may be a good idea to bleach them first, so the blue of the denim doesn’t contribute as much to the final color. I mixed up a bleach solution in a large plastic bin and let them soak for a few hours (I used about 4 gallons of water and 3/4 of a gallon of bleach). After you’ve removed a sufficient amount of color, thoroughly wash the jeans to remove any bleach. If you’re okay with a more muted color, or the jeans you selected were really light to begin with, you can skip this step. If you’re dyeing your jeans a warm color (yellow, orange, red, or pink) you’ll want to get as much blue as possible out of your jeans, and this may take more bleach and a longer soak. Because I was planning on dyeing them turquoise, I stopped bleaching when they were a faint blue color.

Step Four: You’ve got a few different options for dyeing your jeans. Most craft stores carry Rit dye, which is a good option if you’re not planning on doing a lot of dyeing in the future. They’re uncomplicated, cheap, and work on a variety of fabrics, but often don’t have the longevity or brilliance of fiber reactive dyes. I inherited a big box of procion dyes from my mom, so I didn’t have to spend a lot of time or money amassing all the materials needed for this process. This is a pretty good starter kit with some basic colors, if you want to give fiber reactive dyeing a try. Remember, procion dyes only work on natural fibers (cotton, linen, hemp, wool, or silk), so keep this in mind when selecting a garment to dye. If you’ve got all the materials needed for fiber reactive dyeing, all you need are these instructions.

turquoise jeansBecause I already had all the materials I needed to alter and dye these jeans, my only expenditure was the five bucks they cost at the thrift store. Not too shabby for a custom fit pair of jeans!

Posted on by Jessica in Crafts, Sewing, Tutorial | 8 Comments

pickled beets

My history with beets has been fairly limited until recently. In my youth, I caught a whiff of some canned, cubed beets and decided I did not like them. Years later, in my early twenties, I had a turkey sandwich topped with shredded beets. I found them completely inoffensive, and made a mental note to give them another try. That mental note was completely forgotten until I got a few beets in my CSA share, and I realized I was dealing with a vegetable that was all but foreign to me.

Initially, I focused on sweet recipes, because who can resist beets when they’re cloaked in chocolate or studded with poppy seeds? I also made a tasty batch of veggie burgers loosely based on this recipe, in an attempt to recreate my usual order from our favorite Ohio burger joint. At some point, I stumbled across the words “pickled beets”, and knew immediately it would be my next dish.

roasted and sliced beetsA lot of the recipes I looked at started by boiling the beets, but I elected to roast them– I already had the oven going, and I’ll take a roasted veggie over a boiled one any day. To prepare beets for roasting, cut off the stems and leaves close to the top of the beet (if you like, save the greens for later). Rinse the beets thoroughly and wrap them in foil. Bake in a 400 degree oven for about an hour, or until a butter knife easily cuts through to the center of the beets. I roasted my beets a day ahead of time, and let them cool in the fridge. When I was ready to make my pickles, I peeled off their skins and cut them into quarter-inch slices.

As I do with everything I cook, I read a lot of recipes and reviews before I got started. Lots of people mentioned adding hard-boiled eggs to their pickled beets, and I was totally on board. I imagined some purple-hued slices of pickled egg tossed with salad or arranged artfully on a tray with some antipasti. I also thought about the most probable scenario: me, standing in front of the fridge with a fork in hand, eating pickled beets and eggs out of a jar and trying not to leave a trail of fuchsia drops to the sink. It was then that I decided full size chicken eggs might be a bit unwieldy, and I used that excuse to visit a local Vietnamese market and pick up some quail eggs.

hard-boiled quail eggsAt a fraction of the size of a chicken egg, I knew they’d be perfectly bite-sized and easy to fish out of the jar. To hard boil quail eggs, cover with water in a small saucepan, and bring to a roaring boil. Cover the pan, remove from it from the heat, and let it sit for 5 minutes. Immediately rinse the eggs with cold water and allow to cool before peeling. I boiled my quail eggs a day in advance and kept them in the fridge until it was time for pickling.

Pickled Beets, based on this recipe.

2 cups cider vinegar
1 cup water
2/3 cup sugar
3 teaspoons salt
1/4 teaspoon pickling spice
1/2 teaspoon mustard seeds
1 bay leaf
1 1/2 teaspoons whole black peppercorns
1/2 bunch fresh dill
2 red onions
3 medium beets, roasted, peeled and sliced
Optional: A dozen hard-boiled quail eggs, or 4 hard-boiled chicken eggs

Combine the first nine ingredients and half of a red onion in saucepan over medium-high heat, stirring until the sugar is dissolved. Bring to a boil, cover, and simmer for half an hour. Allow the pickling liquid to cool, then chill overnight, allowing the flavors to develop.

On day two, strain the pickling liquid, discarding the solids. Slice the remaining red onion into quarter inch slices. Alternate slices of beet, red onion, and peeled, hard-boiled quail (or chicken) eggs in two quart jars. Fill jars with pickling liquid, then marinate for 24 hours. Keep in the refrigerator.

pickled beetsI had grand plans for these pickled beets, but rather than putting them in elaborate salads or elegant, open-faced sandwiches, I’ve found myself mostly just eating them straight from the jar. After going through a jar and a half, I decided I really needed to put them to use in something, and made myself a rosy-tinted egg salad sandwich by tossing in some diced beets and quail eggs. It was perfect between two slices of thick-cut white bread. It’s no antipasti platter, but the beets transformed a humble childhood favorite into something kind of fancy.

egg salad sandwich

Posted on by Jessica in Food | Leave a comment

around the house

this was a good lunch


the tiniest houseplant


billy balls


succulents in cans


lexi

Lately I’ve been a bit busy with some non-blog-worthy projects, but I should be finished soon and back in the swing of things. Here’s a little of what I’ve been up to:

Because I can’t seem to pass up leeks anytime they’re available at my CSA drop, they tend to accumulate in my fridge before I can decide what to do with them. This is my favorite way to use them up (along with a few carrots). It’s pretty hard to improve a smitten kitchen recipe, but I think adding a poached egg and some bacon just might do it.

My floral-arranging-genius of a mother went all out for my sister’s wedding, and I was lucky enough to take home some of the succulents and billy balls after the arrangements were dismantled. Short a few pots, I stuck some in tin cans that were on their way to the recycling bin. I removed the labels, poked a hole in the bottom for drainage, and painted clear enamel on any part of the can I thought might come in contact with the ground (and by clear enamel, I mean some of this— no need to get fancy). This helps assuage any paranoia I have about leaving rust spots on my porch, but I’d imagine dipping the cans in paint might have a pretty cool aesthetic effect as well.

I managed to snap a pretty good shot of Lexi being casual. She’s pretty camera shy, so most of my cat photography features her sleeping or moving away from the camera. She even manages to distinguish regular phone usage from surreptitious picture-taking, which continues to baffle me.

In other news, we have begun the daunting process of looking for a home to buy. Based on what we’ve seen so far, I can say the odds are pretty good that you’ll see a kitchen or bathroom makeover on the blog at some point. Luckily, I know a pretty good handyman.

Posted on by Jessica in Food, Home, Life | Leave a comment

wedding presents

A couple months ago, my little sister got married. Although my sisters are just six and eight years younger than me, I’ve always felt a sort of parental responsibility for them. I approached Savannah’s wedding as I do all their major life events: with a bittersweet mixture of adulation tinged with a tiny bit of sadness– because I can’t believe how quickly they’ve both grown into such terribly beautiful and brilliant young women. Ok, enough corny gushing and on to the presents:

nan's wedding presentNick carved some wooden spoons from a piece of dalmata, a hardwood from the Peruvian jungle. I got my hands on a couple yards of linen and made my sister some fancy fabric napkins. The pattern I silk-screened has been waiting around for the perfect application, and this was it. You’ll definitely see more of it soon, so keep your eye out.

Of course, I was asked to contribute some macarons:

wedding macaronsI developed a couple of the flavors for these macarons around her wedding colors, but they turned out so tasty, I’ve already got plans to make them again. I love a good lemon macaron, but wanted to come up with something a little different for the yellow-colored treats. When I stumbled across honey powder, I knew it’d be perfect. I added a couple tablespoons to the macaron batter, and mixed up a batch of mascarpone frosting that was sweetened with honey to pipe between the baked cookies. Each macaron sandwich was kissed with a single drop of honey before it was frosted and assembled.

I’ve had the idea for key lime pie macarons ever since I had my first taste of speculoos. If you’re unfamiliar with it, imagine a paste with the consistency of peanut butter and the flavor of graham crackers. It’s an integral part of my recipe because it exactly mimics the flavor of a graham cracker crust. Before I baked a batch of these, I did a quick google search to see if anyone else had the same idea as me– and it seems like a lot of the “key lime pie macarons” out there are really just “key lime macarons”. To make the shells, I added about a half a tablespoon of lime zest to the macaron batter, but didn’t color it, so that the green specks of zest became not only a flavoring agent but a decorative element in the finished cookie. I used the standard recipe for key lime pie filling, but cooked it on the stove top, and strained it like a custard. After it was chilled, it became perfectly thick enough to pipe. Tucked into the center of each macaron, behind a ring of key lime pie filling, I piped a little speculoos. The combination of the softly spiced graham-cracker-like paste and the bright, tart key lime filling was absolutely perfect, and each bite tasted just like a bite of key lime pie. This may be the best thing I’ve ever invented.

Last but not least are the matcha macarons. I’ve made them dozens of times, and they’ll always be one of my favorite flavors. I used a tablespoon of matcha to flavor the shells, and filled them with my standard mascarpone frosting.

As expected, her wedding was incredibly lovely– it was elegant, lively, and so much fun– just like my sister. Of course, I wish for nothing but the most blissful, carefree life for her and her husband. Love you, Nanny-poo.

Posted on by Jessica in Crafts, Food, Life | 2 Comments

vegan chili

Although this is a blog about things I’ve made, most of what I spend time making isn’t featured here at all. I do post about the occasional baked good, but I don’t really document my everyday cooking (and I have to do quite a bit of it to keep up with all this). One reason is that there are already a ton of food blogs out there doing a fantastic job, and while I do my share of off-the-cuff cooking, I’d rather not stop and figure out how much rosemary I just threw in the pot so I can blog about it– that would take away from an activity I find really relaxing and enjoyable. Most of my cooking takes place in the evening, which usually means conditions are less than ideal for food photography. And most importantly, the evening is when I spend time with Nick, and I can’t really do that if I’m stuck behind a camera or jotting down recipe notes.

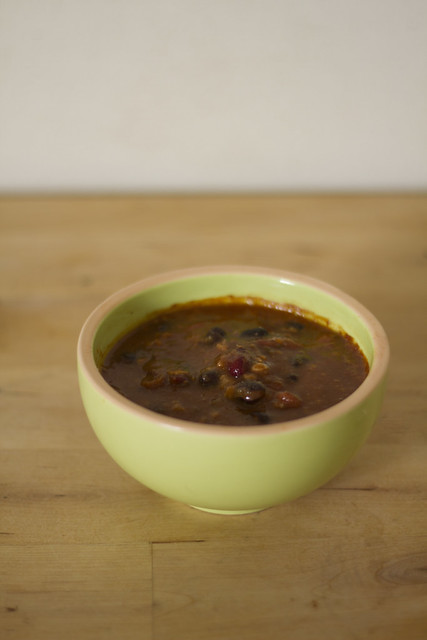
That being said, I have a recipe for you. I made it during the day, when Nick was at work, and when I’d have more than enough light to snap a few pictures. And even though I usually season and taste until I get it just right, this time I took notes on how much of what was thrown into the pot. I give you vegan chili:

vegan chiliFolks, I like bacon just as much as the next guy. Even though I’m an avowed meat eater, I really don’t cook with meat more than a few times a month. Although it’s nice when a meatless dish turns out to be healthier than its meat-filled counterpart, it’s not always true that eating vegetarian is better for you (the ultra-cheesy greens and potato gratin I made last week is a testament to that). One of the reasons I make a lot of vegetarian dishes is that I like a little flexibility– oftentimes, vegetarian ingredients have a longer shelf life than a piece of meat, so I can put off making a dish without worrying about anything expiring in the mean time. However, I usually don’t cook with meat because it’s almost always more expensive, especially if you seek out free-range, hormone-free meats. In the case of this chili, a few cans of beans cost much less than 4 or 5 pounds of beef.

This recipe’s the meatless version of my mom’s famous chili– a dish she makes a giant pot of every Christmas Eve. I adapted her recipe so I’d have something similar to eat, but different enough that her Christmas version is still a special treat. Although there’s no meat, textured vegetable protein lends a toothsome texture. If you’re unfamiliar with tvp, you’re probably assuming it’s some kind of hippie food, and you’re kind of right– but it transforms a pretty basic vegetarian chili into something much heartier. I’ve only tried the kind I linked to, but I’ve also seen tvp chunks and textured soy protein, both of which would work just as well. If you can’t find any of these, you can use a full 1 1/2 cups of bulgur in their place.

A few other secret ingredients help boost the meatiness of this meatless dish: MSG gives this chili a big dose of umami flavor that it would otherwise lack. I found a bag big enough to last forever in the Asian foods section of my local grocery store. You can definitely omit this ingredient if you can’t get a hold of it, but it makes a big difference. I also chuck a few tablespoons of butter (or earth balance, if you’re vegan) into the pot to add some richness. Molasses may seem like an odd addition to chili, but the sweetness helps counter the acidity of the tomato juice, and the dark, malty flavor adds a complexity that rounds out the chili quite nicely.

chili ingredientsVegan Chili

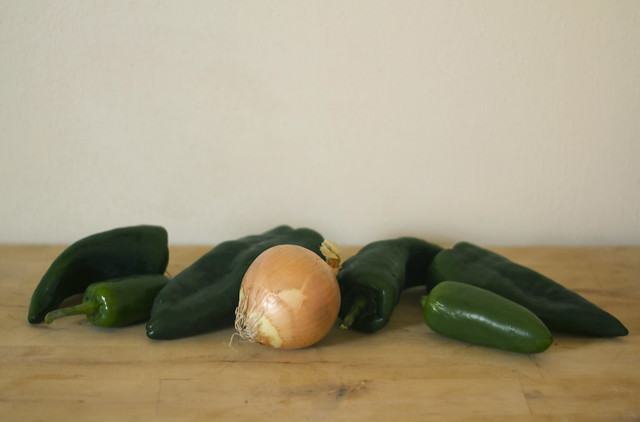
4 poblano peppers (or 2 poblanos and 2 green bell peppers)
1 large onion
2 jalapenos
4 cloves of garlic
2 46oz cans of tomato juice
1 cup of textured vegetable protein
1/2 cup bulgur
2 30oz cans of black beans, drained and rinsed
2 30oz cans of kidney beans, drained and rinsed
1 15oz can of kidney beans, drained and rinsed
4 1/2 tbsp cumin
1 tbsp chili powder
1/2 tbsp MSG
5 tbsp molasses
4 tbsp butter (or vegan alternative)
salt to taste

The first step is to remove the tough skin of the poblano peppers. If you’re lucky enough to live in a house with a gas stove, you can easily turn on a burner and char away, but I do not, and my broiler is weird and unreliable, so I just scorch them with a blow torch.

charring a poblanoOnce the skin is charred and blistered, immediately slip each pepper into a zip-lock bag and leave them to cool for 15 minutes or so. Afterwards, you should be able to rub the skin off with a clean paper towel.

I am not a big fan of chunks of peppers and onions, so I usually chop these ingredients into smithereens. If you don’t mind a chunky chili, you can make pretty quick work of chopping up the onion and peppers, but it takes me quite a while to get through it all. If I’m feeling lazy, I’ll only chop one poblano, a jalapeno, and half the onion. I put the rest of the onion and peppers into a blender with a little of the tomato juice and make a pepper puree. It takes a lot less time and adds a bit of body to the chili.

Heat a tbsp or so of oil in a large stockpot (I use a 16 qt) over medium heat. Add your chopped peppers and onion, and cook until they’re tender but not browned. Add the garlic, minced, and cook for another minute. Pour in the tomato juice (and pepper puree, if you’ve made some) and bring to a low boil.

While this is heating, prepare your tvp according to the package directions. If you want to keep it vegan, you can use vegetable stock, some of the tomato juice, or just plain old water to rehydrate it, but I often use chicken or beef stock for a little extra flavor.

When the tomato juice starts bubbling, add the beans, bulgur, spices, butter, and molasses. Keep at a low boil, stirring occasionally, until the bulgur is fully cooked. Toss in the re-hydrated tvp and salt to taste.

A batch of this chili will easily serve a dozen hungry adults, and can be stretched even further if you serve it with a side of cornbread, or my favorite, spooned over a baked sweet potato and topped with a little monterey jack cheese. Because it can be made vegan, it’s perfect for serving to a group with a variety of dietary needs. I like to freeze individual servings and reheat them for a quick and hearty lunch.

Of course, this is a pretty basic recipe and is easily adaptable. Feel free to swap the poblanos or jalapenos for whatever peppers you fancy, and don’t feel limited to black and kidney beans. If it’s your thing, add in some chopped roasted tomatoes or some corn. My recipe is what I’d consider a medium-level of spiciness, but you can make it milder by leaving out a jalapeno or hotter by adding another (or cayenne pepper, to taste).

If you make a batch, let me know what you think!

Posted on by Jessica in Food | 2 Comments

nebula shirt

nebula shirtFor Christmas, I made my brothers some nebula shirts. I looked at a lot of online tutorials and gleaned a little bit from each one, but also came up with a couple of my own techniques.

  • I started with two black, 100% cotton tees. If you’re using fiber reactive dyes, it’s important to make sure the garment you’re dyeing is made of natural fibers. You can get away with using something that is mostly made of natural fibers, but the dyes won’t be as vibrant.
  • Next, I filled a spray bottle with bleach and sprayed the shirts down (front and back). For some reason, the bleach I bought wasn’t especially potent, and the spots I sprayed never got lighter than a brownish-red color. It’s best to test a hidden spot of your garment with a drop or so of your bleach to see the effect it has. It could be that a solution of bleach and water is strong enough to lighten your garment (and you can always bleach more if need be). I concentrated the bleach spray in a few areas and left a couple spots pretty black for contrast.
  • I let the shirts sit for a half hour or so, then ran them through the wash to remove the bleach.
  • The shirts went straight from the washing machine into a baking soda solution to prepare them for dyeing. I used four or five different colors, but it’s hard to see much more than the purple and blue. If I’d had more time, I’d have mixed up a stronger solution of each of my other colors and re-dyed the shirts, but as usual, I was down to the wire. Although they didn’t quite match my reference image, the blue and purple gave it enough of a nebula look that I was satisfied.
  • After applying the dye and letting the shirts set overnight, I washed and dried them. The last step is to dip an old toothbrush (or any comparable brush) in white silk screen ink (or fabric paint), and flick white specks over the shirts to make stars. I left most of the small specks alone, but I used a q-tip to spread out the ink on the larger stars to create shine lines. After the ink dried, I heat set it and gave the shirts one more wash and dry.

Although they took some time to make, the effect is pretty dramatic. I may have to find myself a pair of black cotton tights so I can wear nebulas on my legs.

In other news,
– I made this a little while ago, and it was really tasty.
– Saw this movie last night and was thoroughly entertained.
– Next up is one of my staple recipes, so come back soon.

Posted on by Jessica in Crafts, Experiments, Links | 2 Comments

woven table runner

hand woven table runnerMy mom-in-law can be a tough one to make presents for. Although she’d sincerely love anything Nick or I made her simply by virtue of our effort, it can be challenging coming up with useful gift ideas for things she doesn’t already have. When she sent me this book for my birthday and a card that jokingly said, “Now you have to weave me something!”, I started brainstorming.

I remembered how much she admired the pattern and color of the scarf I made my mom last year, but knew I’d have to think of something else to weave– we’re talking about a lady who’s so warm-natured, she can be seen rocking shorts and sandals 360 days a year. So, a table runner it was!

hand woven table runner
Like the scarves I made, this table runner is woven in overshot (using two colors of thread in the weft), but I also moved the selvages in a little so I could create a plain weave border with the cream colored thread. The differences in the sizes of thread and the types of weave resulted in a lot of contrast (both visually and tactilely) between the patterned section and the border. I’m pretty proud of this one.

Now, if only I could find myself a cheap loom so I could get weaving again– anybody within driving distance of Fort Worth looking to get rid of one?

Posted on by Jessica in Weaving | 1 Comment

jewelry for christmas

gem earringI made a couple dozen pairs of these fimo gem earrings to give to all of the ladies in my life. You can make them in virtually any color, and they’re very quick and inexpensive to put together. My ears aren’t pierced, but if they were, you can be sure I’d have a pair of these for every outfit. To make a pair, just:

– Knead a little fimo until it’s pliable, and form into a rough ball.
– Use an exacto or craft knife to make clean slices from the very edges of the fimo ball. Continue to rotate and slice until you’ve got a gem shape you like (it may take a little practice to get it just right).
– Bake according to the package directions, and allow to cool.
– Attach to an earring back with a little dab of glue (I used this).

necklacesI used the same method to make some gem-shaped beads for matching necklaces. It’s an excellent last-minute gift idea, because you can have a pair of earrings (or a necklace) made in under an hour.

Posted on by Jessica in Crafts | 3 Comments

a dyed basket

hand woven basketLongtime readers may recognize this as the same style of basket from this first basket post. Although I’ve woven a few different types of baskets since then, the potato basket remains my favorite. My plan was to dip it a couple times in a tub of latex paint, giving the bottom half of the basket a smooth, matte coating to contrast the textured reeds it’s made of. But when I hadn’t yet dipped the basket a couple days before we were set to drive to Houston, I realized I’d have to come up with a new plan, or risk getting wet paint in my car. I had a bucket of dye left over from this project, so in it went. I love the way the reeds soaked up the dye– even in parts that weren’t submerged, you can see tiny veins of bluish-green. I finished the top off with a little tung oil, and the basket was complete.

Check back later for more handmade presents!

Posted on by Jessica in Crafts | Leave a comment